EnvisioKnit User's Manual
Download a print-friendly version (PDF).
Table of Contents
- Getting Started
- The Chart Editor
- The Pattern Editor
- The Yarn Studio
- Stitches
- Printing and Exporting
- Settings
- Tools
- Hotkeys and Shortcut Keys
- Other Features
Other Chart Editor Features
Replacing Stitches and Yarns

Right-Clicking a cell on the Chart Shows the Menu
Once you've drawn a design on your chart, you may want to exchange one stitch or yarn for another. You can do this instantly with the Replace feature. Right-click on your chart, on a cell containing the stitch or yarn that you want to swap. A menu will appear where you can select Replace in Chart. Then select one of the following sub-items: Replace Yarn, Replace Stitch and Replace Yarn and Stitch
You will be replacing all instances in the chart of the yarn, stitch, or yarn and stitch (together) of the cell you have right-clicked on. A window will appear allowing you to select the replacement yarn and/or stitch. Make your selection and your chart will be instantly updated with the change. If you make a mistake or change your mind you can revert this command with the Undo button.
Replace Yarn
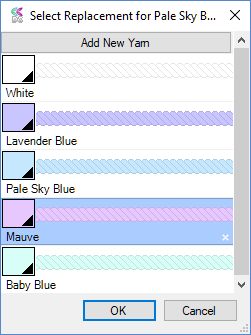
Select a Replacement Yarn
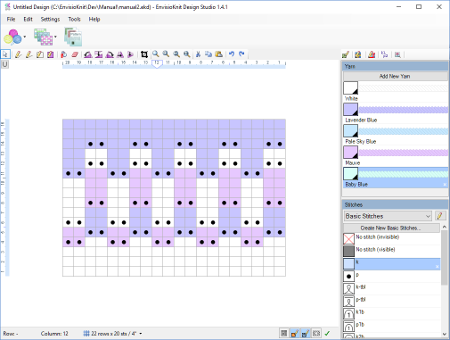
The Result after Replacing Blue Yarn with Mauve
Right-clicking a chart cell and doing the Replace Yarn command will replace the yarn of the cell you have clicked, throughout the chart, with another yarn of your choice. The yarn will be replaced in all cells that use it, regardless of their stitch. The replacement is done within the scope of the current chart, so other charts in your design will not be affected.
Replace Stitch
Similar to Replace Yarn, the Replace Stitch command will swap the stitch of the cell you have right-clicked, throughout the chart, with an alternate. The stitch will be replaced in all instances in the chart, regardless of the yarn it is being used with.
Replace Yarn and Stitch
The Replace Yarn and Stitch command will swap the contents of all cells that use both the yarn and stitch of the cell you have right-clicked. For example, consider a chart that uses white and black yarns, and knit and purl stitches in both colors. If you do Replace Yarn and Stitch on a black knit cell, only other cells that are both black and knit will be replaced.
Replace in Selection
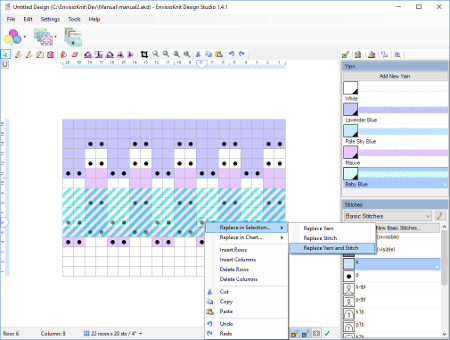
Replacing in Selection: Replace Yarn and Stitch for White Purl
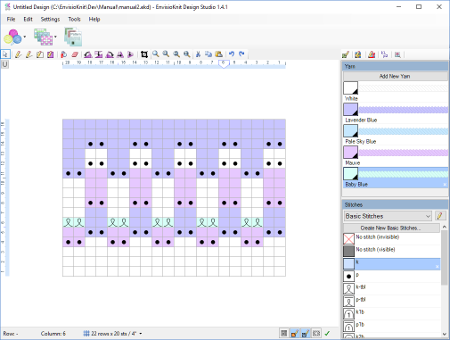
The Result after Replacing White Purl with Baby Blue K-tbl in Selection
You may want to make a replacement, but only within a certain part of your chart. You can do this by first selecting the part of the chart that you want to replace (with the Select tool). Then, in the selected area, right-click on a cell containing the yarn and/or stitch you want to replace. A menu will appear containing a Replace in Selection option, with the same sub-options as Replace in Chart. Replace in Selection works identically, but only applies the replacement within the selected area.
Create New Chart from Selection
You can create a new chart from a portion of an existing chart. Select the part of the chart that you want, and right-click on it. Select Create New Chart From Selection from the menu that appears. A window will appear where you can set the name of the new chart, as well as which row and column the chart starts on.
By default, the First Row and Column will reflect the location of your selection in the original chart. If your selection included setup rows, those will be included by default in the new chart as well. If the first row of your chart is a right-side row, the checkbox indicating this will be set. All of these settings can be adjusted. The Open in Chart Editor checkbox can be set if you would like to immediately open this new chart for editing when you click OK.
Inserting and Deleting Rows and Columns
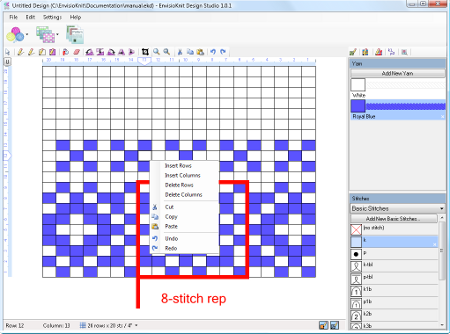
Right-Clicking on the Chart Shows the Menu
It's possible to remove or insert rows and columns anywhere on your chart. To do this, just right-click on the chart where you want to make the change. A menu will appear so that you can select what you want to do.
In the example shown on the right, we are choosing to delete rows.
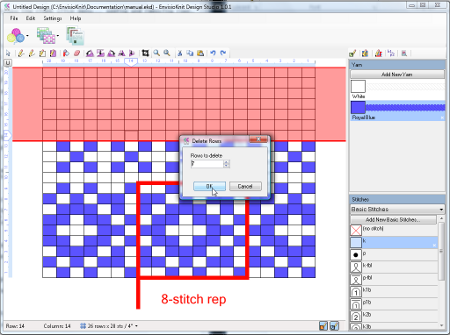
Select Number of Rows to Delete
Select the number of rows or columns to insert or delete. When inserting, the yarn and stitch motif of the inserted stitches can be selected.
In our example, we are deleting 7 rows. The rows that will be deleted are shown highlighted in red.
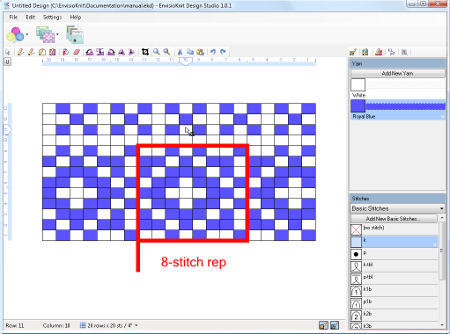
The Rows are Removed from the Chart
Click OK and the insertion or deletion is executed.
Rulers

Chart Rulers Tracking Rows and Columns
The chart rulers are always visible whenever the chart is in an editable mode (every mode except Preview). By default, the rulers track your cursor position on the chart by row and column.

Chart Rulers Tracking Units
Clicking the small button in the upper left corner switches the rulers to track the cursor by units instead (inches or centimeters, depending on your settings). This helps give you a sense of where you are on the chart in terms of dimensions. Click the ruler button again to switch back to rows and columns.
Cursor Coordinates

Cursor Position
You can always tell which row and column your cursor is on by looking at the cursor coordinates below chart, on the left.
Grid Settings

Grid Settings Menu
Clicking the grid settings button, in the lower left below the chart, opens a menu with several options related to the chart grid. These settings include the gauge, numbering, grid color and background color (the no-stitch color), as well as the options to show the grid and show borders.
Chart Gauge
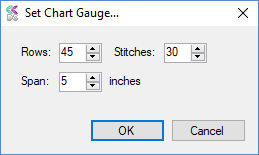
Chart Gauge Settings
Choosing the Set Gauge... item will allow you to adjust the gauge of the current chart. You can set the number of Rows and Stitches over a Span of inches or centimeters.
Chart Numbering

Chart Numbering Options
Selecting Set Numbering... from the Grid Settings will open the chart numbering options. Here, you can set the First Row and First Column numbers for the chart. These can be any number 1 or greater.
Enabling the Skip every other row option will indicate that your chart only shows odd or even rows (depending on your First Row setting). For example, if the first row is 1, then the next row will be 3, then 5 and so on. This setting is useful if you are designing a chart that has patterning only on right side rows. Uncharted wrong-side rows are assumed to be worked in the established pattern.
Setup Rows

Labeling Setup Rows
It is possible to have unnumbered setup rows before the numbered chart rows begin. You can add them by specifying the number you want in the Setup Rows setting. After the setup rows, the chart will begin numbering with the number you have specified for the first row. If your chart has setup rows, the first row of the chart is considered to be the first row after your setup rows.
Setup rows are unnumbered by default. You can apply custom labels to setup rows by clicking the Setup Row Labels... button and entering the label(s) that you want. Setup rows can be blank, uniformly labeled, or individually labeled. For example, if you have 2 setup rows, you can specify "Setup" for the label and it will apply to both setup rows. For individually labeled setup rows, specify the labels for each row, separated by commas (e.g. "Setup Row 1,Setup Row 2"). Each setup row will be labeled correspondingly.
Pass Settings for Brioche and Other Multiple Pass Charts

Rows with Multiple Passes
Some knitting techniques (such as Brioche and other slipped stitch patterns) require 2 or more passes to be worked for each row. This can affect how the chart is numbered and worked. The Chart Numbering settings include options for such charts. In addition to specifying the number of Passes per row, you can specify Pass Labels (in addition to the row numbers) and which of those passes your chart begins with.
Pass labels can be set to alphabetic, none or custom.
- The Alphabetical setting will append a letter to each row number indicating the pass (i.e. for 2 pass rows: 1a, 1b, 2a, 2b, etc.).
- Setting pass labels to None will number the rows numerically, without pass labels (i.e. 1, 2, 3, 4, etc.).
- With Custom
pass labels, you can enter a comma-separated sequence of pass labels to use. For 2 pass rows, you could
specify custom pass labels " LC, DC" and the result would be rows labeled 1 LC, 1 DC, 2 LC, 2 DC, etc.
If you would like the custom pass labels to be different on wrong-side passes, append a | (pipe, or bar) character after the right-side label, followed by the wrong-side label. For example: LC LS, DC LS| LC DS, DC DS
If you have more than one pass per row, but your first row (not counting setup rows) does not start on the first pass, you can set the First row is pass setting to the starting pass. For example, if you have 2 passes per row, a and b, and you want your chart to start with 1b instead of 1a, then first row is pass should be set to 2.
If you are working with separate strands of yarn for each pass (such as for 2 color Brioche) you may want each pass to start on the same side of the chart per row. With flat knitting, this means that if the first pass is a right-side pass, subsequent passes will also be right-side. The passes for the following row will then be wrong-side. Check Start passes on same side per row to enable this. If this setting is not enabled, each pass will start at the end of the previous pass. The generated stitch instructions and position of the row numbers at the starting side of the row will reflect this setting.
Viewing the Chart in Grayscale
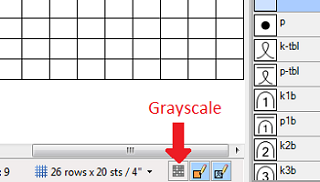
The Grayscale button
For colorwork designs it can be helpful to view the pattern in grayscale to see how the color values are balanced. EnvisioKnit has a grayscale viewing option that you can enable.

Viewing a Chart with Grayscale Enabled
The grayscale button is located at the bottom right of the chart editing panel. Click it to view the chart in grayscale, and click again to view the chart normally. Please note that grayscale is only a viewing tool, your chart output will still be in full color even if grayscale is enabled. Also, the chart preview will be in color even with grayscale enabled.
Yarn and Stitch Masking
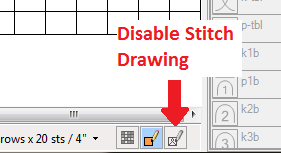
Disable Stitch Drawing
It is often useful to draw only yarns or only stitches. To do this, EnvisioKnit allows you to disable either yarn drawing or stitch drawing. The buttons for disabling stitch drawing and yarn drawing are located in the bottom right of the chart editing panel.
Disabling stitch drawing is helpful when you are drawing color patterns and don't want to draw over the established edge of the chart.
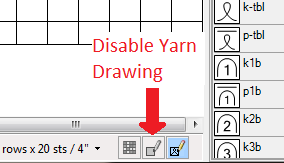
Disable Yarn Drawing
Similarly, adding texture or shaping to a color-patterned area can be easier if you disable yarn drawing.
Chart Masking

Chart Mask Settings

Chart Mask Button (outlined in red)

Chart Mask Shown and Enabled on Every Other Row and Background
When enabled, the chart mask will preserve masked areas from being drawn or pasted over. For example, if you would like to draw over your chart without affecting wrong-side or right-side rows, or without drawing over an established no-stitch edge, you can do so with the Chart Mask. Which areas should be masked can be specified by clicking the Mask button and adjusting the Chart Mask Settings.
The Mask button is located at the bottom right of the chart editing panel. If the mask is enabled, the button will appear highlighted.
The Mask Settings include: mask every-other row (with the sub-option to start on the first row), mask the background (invisible no-stithc), mask the visible no-stitch, and an option to show the mask in the Chart Editor as an overlay covering masked regions.
The Chart Checker

No errors found

Chart contains errors
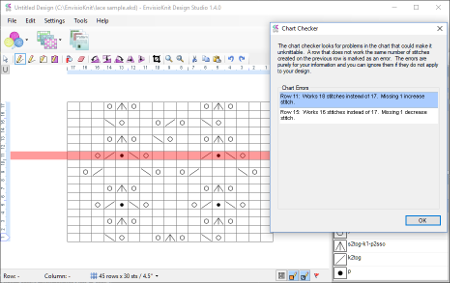
Chart Errors Indicated on Chart
The Chart Checker is a tool for finding errors in your chart that would make it unknittable. In general, the number of stitches worked on a row should be equal to the number of stitches made on the previous row. If that is not the case, a chart error is flagged. The chart checker errors are only informational, but they can be helpful when proof reading your chart.
The Chart Checker status icon is shown in the lower right corner of the Chart Editor. When no chart errors are found, the indicator shows a green check icon. If there are errors, a red flag is shown. The chart checker status is refreshed automatically whenever you change the chart.
Clicking the Chart Checker icon will open the Chart Checker window. If there are errors in the chart, it will present a list of them. Each error specifies the row it occurs on and the reason why it was flagged. Selecting an error in the list will highlight its row in the chart editor window.
In the example shown here, there are two rows with errors found. As indicated in the Chart Checker window, Row 11 is lacking an increase and is highlighted in red on the chart. Inspecting the row, it appears that a yarn-over is missing from the pattern. Row 15 is also listed as lacking a decrease, which could be fixed with a double-decrease to replace the k2tog in the middle of the row.
